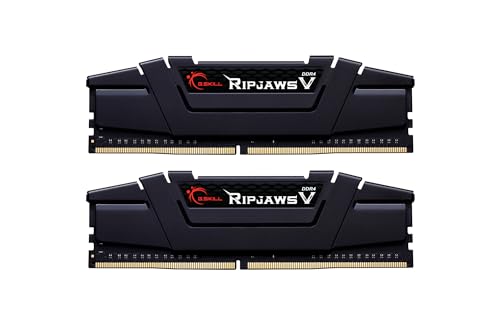
Unleash Your PC’s Potential: A Practical Guide to Installing and Optimizing G.SKILL RipjawsV DDR4 RAM
Ready for a real boost to your computer’s speed and responsiveness? Upgrading your system’s memory is a smart move for anyone looking to game smoother, multitask better, or just have a snappier daily experience. The **G.SKILL RipjawsV Series DDR4 RAM** offers a fantastic way to do just that, bringing serious performance to your Intel or AMD desktop. We’ll walk through getting it into your machine and making sure it runs at its best.

You’re about to give your computer the memory it deserves, and it’s simpler than you might think to get this powerful upgrade working for you.
Product Highlights
- Solid Construction: Features a sleek, low-profile aluminum heat spreader that looks good and keeps your memory cool even when things get busy.
- Effortless Integration: Designed for easy physical installation in most desktop cases, fitting comfortably under many CPU coolers.
- Peak Performance: Delivers a speedy **3200MT/s** with tight **CL16-18-18-38 timings** at just **1.35V**, offering a great balance of speed and stability.
- Wide Compatibility: Built to work seamlessly with both Intel and AMD platforms, making it a flexible choice for almost any modern desktop build.
- Gaming & Multitasking Ready: This **32GB (2x16GB)** kit is ideal for demanding games, video editing, streaming, and running many applications at once without a hitch.
Memory Kit Comparison
| Model | Key Features | Price | Link |
|---|---|---|---|
| G.SKILL RipjawsV 32GB (2x16GB) | **DDR4 3200MT/s, CL16-18-18-38, 1.35V**, XMP 2.0 Ready, Dual Channel Kit, Low-Profile Heat Spreader | Check Price | View on Amazon |
| Corsair Vengeance LPX 32GB (2x16GB) | **DDR4 3200MT/s, CL16**, XMP 2.0 Support, Aluminum Heat Spreader, Compact Design | Check Price | View on Amazon |
| Crucial Ballistix 32GB (2x16GB) | **DDR4 3200MT/s, CL16**, XMP 2.0 Ready, Anodized Aluminum Heat Spreader, Gaming Memory | Check Price | View on Amazon |
Deep Dive: What Makes This RAM Tick?
This G.SKILL RipjawsV kit isn’t just about big numbers; it’s about smart design. The **3200MT/s speed** combined with **CL16 timings** means your CPU gets data quickly, reducing bottlenecks. The “CL” stands for CAS Latency, and a lower number here is better, representing fewer clock cycles for data access. For gamers and creators, this speed and latency directly translates to smoother frame rates and faster project renders.
The **XMP (Extreme Memory Profile)** feature is a real game-changer. Memory modules often run at a slower default speed out of the box. XMP is an Intel-developed technology (also supported by AMD boards as A-XMP or DOCP) that allows your motherboard to automatically configure your RAM to its advertised, higher speeds and timings with a single click in the BIOS. This means you don’t need to manually tweak voltage or timings, keeping things simple and stable. With **32GB across two 16GB modules**, you’re also setting up your system for **dual-channel operation**, which essentially doubles the data path between your CPU and RAM, providing another nice speed bump.

Pros and Cons
Pros
- Fantastic **3200MT/s speed** with tight **CL16 latency**
- **XMP 2.0 profile** makes full speed easy to activate
- Reliable performance for **gaming and demanding apps**
- Sleek, **low-profile heat spreader** fits many builds
- Strong compatibility with both **Intel and AMD systems**
Cons
- None at this price point for its category
- May be overkill if your PC usage is only light browsing
Getting Started: Installing Your RipjawsV RAM
Getting your new memory into your PC is straightforward. Here’s how to do it:
Prep Your System
- **Power Down:** Turn off your computer completely and unplug it from the wall.
- **Open Case:** Carefully remove your PC’s side panel to access the motherboard.
- **Ground Yourself:** Touch a metal part of your PC case to discharge any static electricity. This protects your components.
Locate RAM Slots
- **Find DIMM Slots:** Your motherboard will have 2 or 4 long slots, usually near the CPU. These are your DIMM (memory) slots.
- **Check Your Manual:** For the best performance, especially with a 2-stick kit, consult your motherboard manual. It will tell you which specific slots to use for dual-channel (often slots A2 and B2, or the second and fourth slots from the CPU).
Install the Modules
- **Open Clips:** Gently push open the small white or black clips at each end of the RAM slot.
- **Align Notches:** Look at the small notch on the bottom edge of your RAM stick. Match it carefully with the raised section in the RAM slot. It only fits one way.
- **Press Firmly:** Place the RAM stick into the slot. Press down evenly and firmly on both ends of the stick until the clips snap into place, securing the module. You should hear a soft click.
Unleashing Full Speed: Enabling XMP
After physical installation, your RAM might not be running at its full **3200MT/s** speed yet. You need to enable XMP in your computer’s BIOS.
Power Up and Enter BIOS
- **Boot Your PC:** Plug your computer back in and turn it on.
- **Access BIOS/UEFI:** As soon as you see your motherboard’s logo, repeatedly press the key to enter your BIOS (often **DEL**, **F2**, **F10**, or **F12**). Check your motherboard manual if you’re unsure.
Find the XMP Profile
- **Navigate BIOS:** Once in the BIOS, look for an “OC” (Overclocking) menu, “Tweaker,” “Advanced Memory Settings,” or something similar.
- **Locate XMP/DOCP:** Search for options like “**XMP**,” “**Extreme Memory Profile**,” “**A-XMP**,” or “**DOCP**” (Direct Overclock Profile for AMD).
Select the Correct Profile
- **Enable:** Select the XMP option and choose the profile that matches your RAM’s advertised speed and timings (e.g., **DDR4-3200 CL16**). There might be only one, or a few options. Pick the one that matches **3200MT/s CL16-18-18-38**.
Save and Exit
- **Confirm Changes:** Save your BIOS settings and exit. Your computer will restart.
Verify Performance
- **Check Speed:** Once Windows loads, open **Task Manager** (Ctrl+Shift+Esc), go to the “Performance” tab, and click on “Memory.” You should see your RAM speed listed as **3200MHz**. You can also use free tools like CPU-Z for a detailed check.
With XMP enabled, your G.SKILL RipjawsV RAM will perform exactly as it was designed to, giving you the full 3200MT/s speed and snappier system responses.
Final Call to Action
Ready to experience the difference a memory upgrade makes? This G.SKILL RipjawsV kit is waiting to supercharge your system.
Alternatives to Consider
- **G.SKILL RipjawsV Series 16GB (2x8GB) 3200MHz:** If 32GB is more than you need, a 16GB kit offers a solid performance boost for less.
- **Kingston FURY Beast 32GB (2x16GB) 3600MHz CL18:** For those looking to push speeds even higher, a 3600MHz kit could be a good choice, provided your motherboard and CPU support it.
- **TEAMGROUP T-Force Vulcan Z 32GB (2x16GB) 32200MHz CL16:** A budget-friendly alternative that still delivers reliable DDR4 performance at similar speeds and timings.

Ready for a Faster Ride?
Giving your computer new RAM is one of the most satisfying upgrades. The **G.SKILL RipjawsV 32GB 3200MT/s CL16 kit** makes this process simple and rewarding, offering serious performance for gaming, work, and everything in between. Enjoy the smoother experience!
### Hashtags
amazon, productreview, deals, shopping, finds, techpick
Leave a Reply